The Guruplug Server + is a nice and small ARM machine. It has a 1,2 GHz CPU, 512 MB RAM, two Gigabit Ethernet ports, WiFi, Bluetooth, an eSata port, two high speed USB host ports, a microSD card reader, etc. The problem with this machine is that it has a flagrant design flaw: The internal heatsink is unable to keep the CPU and memory cool, and this makes the system highly unstable. In my first tests, the system was continuously rebooting even with medium-low CPU loads. This problem was reported to Globalscale (why didn't they discover it anyway?), and in the second batch of Guruplugs, the heatsink was replaced with a tiny and very very noisy fan. The heat problem was solved, but for most users, the noise created a new problem.
To solve the heat problems, I decided to mod my Guruplug. I removed the heatsink, the internal 5V power source (later I used it for The Fonera Plugstrip) and used the hollow it left to add a big heatsink with a silent fan.
 |
| The removed tiny heatsink |
 |
| The removed power source |
 |
| The heatsink with the fan occupies the space left by the power source |
 |
| Another capture of the heatsing with the fan |

On the software side, I have built a custom Ångström GNU+Linux distribution. To build the system I have used OpenEmbedded, a set of tools, scripts and configuration files, aimed to build GNU+Linux distributions for embedded systems. OpenEmbedded uses a tool called BitBake for building. BitBake is similar to the Portage tool used in Gentoo distribution, but it is aimed to cross compile for embedded systems.
The Ångström OS image I have built is console based (no X-Windows) and has tools for file serving (samba, ftp, sftp), file sharing (aMule daemon, rtorrent), file downloading (plowshare), and media serving (mediatomb). I have also created some scripts that report specific events to a Twitter account (using OAuth authentication), automagically mount external USB disk drives read only (for unpluging without having to manually unmount them), and share its multimedia contents via mediatomb.
The system works perfect, but I was still missing something: a way to promptly know the system status at a glance, without having to use a computer/smartphone/tablet with a SSH or web client. For that task, I dedided to create USBLCD.
 |
| LCD + LEDs + Pushbuttons + USB |
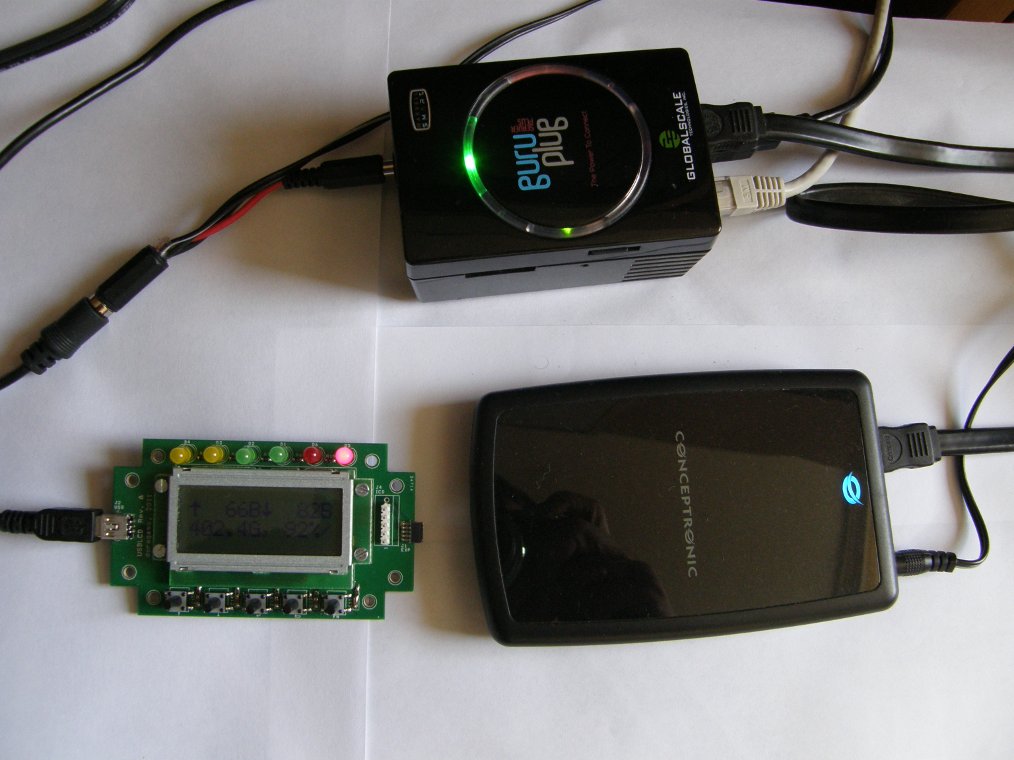 |
| Guruplug + USBLCD + eSata HDD |
BONUS: for the LCD, I have used one without backlight, but the board is also prepared for displays with LED backlight. There is a small mosfet transistor driven by a PWM inside the microcontroller, that can drive LEDs up to 300 mA. I have connected another USBLCD board to a white LED strip and have coded a PWM driver. The firmware allows you to change LED intensity from 0 to 100% in steps of 1%, and it also has a timer that automatically shuts down the light when the count hits 0. Both the remaining time and the LED intensity are shown in the screen. Source files for this function, here.
No comments:
Post a Comment